Knitting a Top Down Sweater: Dividing for Sleeves

When you are knitting a top down sweater like a yoke or raglan pattern, after you complete the shoulders and top of bust, you will separate the sleeve stitches from the body stitches. The sleeve stitches will be held unworked as you finish the body down to the waist.

Joining the front and back of body creating a sleeve

In the Fireworks pattern by Olive Knits, at the beginning of the round you will work a few extra stitches before you separate the body and sleeves. This is because your BOR (beginning of round) is at the top of the shoulder and you must first work to the stitches that will be under the arm. Where you place your first marker is going to be the new BOR. Then you will continue by working a certain number of stitches for the front, slipping the appropriate number of stitches for one arm PURLWISE onto waste yarn, adding a few stitches under the arm, working a certain number of stitches for the back (this brings the front and back together), slipping stitches purlwise for the other arm, adding stitches for under the other arm, and joining the back to the front.

For other top down patterns, the process is the same, but the position of the BOR will change the process a little. A well written pattern will give exact numbers of stitches to work and slip and in what order.

Most patterns suggest holding sleeve stitches on waste yarn. But if you have extra cables you can use those instead. It is important that you use a generous length of waste yarn or a long cable so it will be easy for you to try on your sweater. That’s one of the big advantages of making a top down sweater!

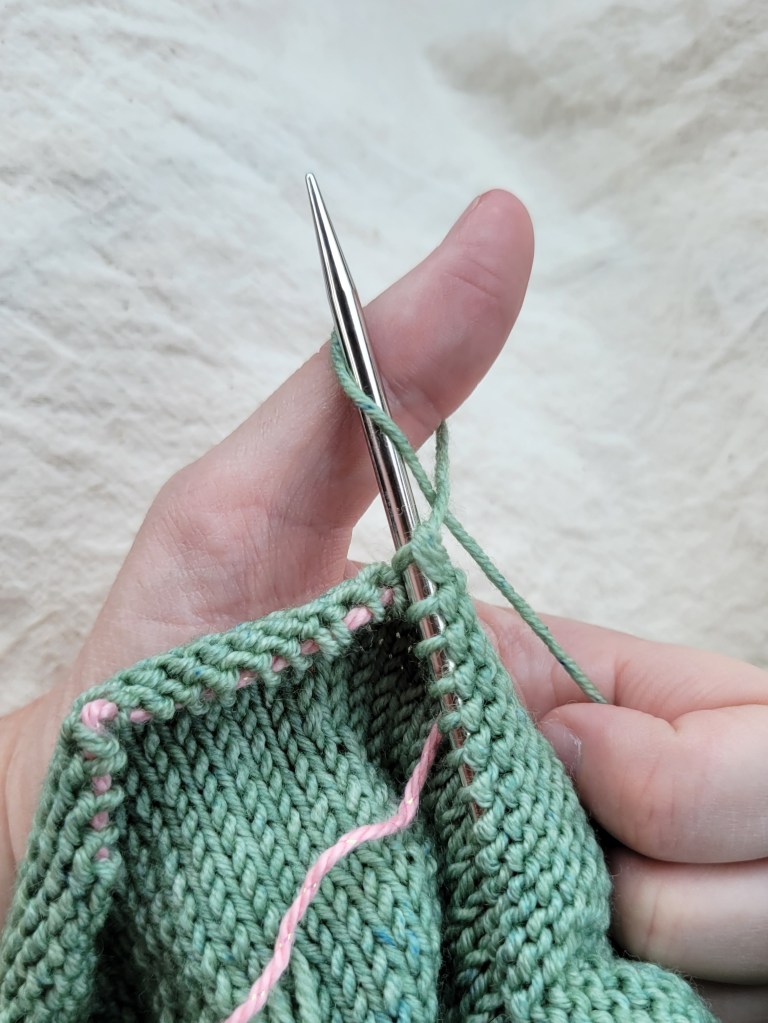
To slip stitches to waste yarn, you will need a tapestry needle and a generous length of waste yarn. (See images below) I recommend using a contrasting yarn in a lighter weight than your work. Thread your waste yarn on your tapestry needle, but don’t knot it. Slip stitches PURLWISE onto the tapestry needle the same way you would slip them from the left to the right needle. Continue working your stitches down your waste yarn, but don’t let them fall off the other end! When you have the appropriate number of stitches slipped for one sleeve, tie the ends of your waste yarn together so you don’t drop the stitches. Be sure to leave plenty of room for you to try on your sweater.

If you are using cable needles, use any needle size smaller than what you are knitting with. This keeps from stretching your stitches and changing the gauge. Slip stitches PURLWISE from the left needle to the new cable being careful to not let them slip off the other end. Secure your needles together so stitches won’t fall off as you are working the body. Be sure to use a cable long enough to allow you to try on your sweater!

My favorite way to hold sleeve stitches is on an interchangeable cable so the needles don’t get in the way. For this technique, you will need:

  • an extra cable long enough to allow you to try on your sweater
  • a needle any size smaller than what you are knitting with
  • something to secure your cable, like a connection piece or stoppers

Attach the needle to one end of the cable and a connection piece or a stopper to the other end. Slip your stitches PURLWISE as described. Then replace the needle with the other end of the connection piece or the other stopper.

After your sleeves are separated from the body, you are ready to work the rest of the body! You will come back to the sleeves after the body is complete.

Find more details on the Fireworks KAL here.

Slipping stitches purlwise onto waste yarn
Backward loop cast on under the arm
Add marker between 2 cast on stitches to mark the center under the arm
Materials for holding stitches on an interchangeable needle cable
Slipping stitches onto a cable

Agape Love Shawl Crochet Version and 9 Tips for working with Mohair

Happy Valentine’s Day! Treat your Valentine or yourself to this soft, luxurious scarf designed by Judy Busby at Jems Luxe Fibers and translated to crochet by me, Katie Clark.

Agape Love is an unconditional love that transcends and persists regardless of the circumstance.  Agape is the Greek term for Love – the highest expression of love – a pure and  selfless thing.

This shawl is a fun and quick crochet using minis and mohair.  Every row begins with decreases that shapes this colorful shawl.  Have fun with your colors and let it reflect the love you’ve experienced, how it has shaped and reshaped you.  God’s love for you and me is passionate, pure and beyond anything we’ve ever experienced, accepting us as we are.  He reminds us of our worth and beauty as His daughters.  He loves us with unconditional Agape Love.  God is Love!

Judy Busby, Jems Luxe Fibers

If you’ve never used mohair, you’ll find it takes some patience to work with. So before we get into the pattern, let me give you a few tips for working with mohair.

Tip #1

Use a larger hook or needle to retain loftiness. The wonderful thing about mohair is the silky halo of fiber that surrounds the core. Using a hook or needle that is too small will compact the fibers, negating the effect.

Tip #2

Work loosely. For the same reason as above, use a gentle hand. Or if you have a tendency to stitch tightly, go up another size or two.

Tip #3

Hold with another yarn to add softness, halo & warmth. The fibers aren’t just beautiful. They are very useful for insulating. Used alone, mohair is surprisingly warm. So adding it to another yarn will make your finished piece that much warmer.

Tip #4

Ask your LYS to wind your yarn. Especially if you’ve never used mohair before, because it is so clingy. You don’t want to be frustrated with your yarn before you even begin your project. If you must wind it yourself, try loosening fibers before winding by gently spreading the strands apart to keep them from matting together as you wind.

Tip #5

Do not work cake or ball from inside. I’m a work-the-ball-from-the-inside kind of girl. I do it even when it’s not recommended. Except for mohair. Ever. The fibers pull on each other and you end up with a big mess. Ask me how I know.

Tip #6

Use excellent lighting. This is always important, but especially when using mohair. The halo can make the core strand difficult to see. Good lighting can help and if you really can’t make out your stitches, try holding it up to the light.

Tip #7

Don’t worry so much about mistakes. The halo hides a lot. But if necessary, hold your work up to light to check.

Tip #8

Be patient when taking out stitches. It’s inevitable that you will have to take some out eventually. But try not to get frustrated. Don’t pull so hard that you rip the core, but don’t be afraid to tear fuzz to separate the strands.

Tip #8

Most of all, be patient! It’s is different than any other fiber. But the soft luxurious mohair is worth it!

Now on to the Agape Love Shawl Crochet Version!

Agape Love Shawl

Difficulty
Beginner

Finished Measurements
Approx. 90 inches by 6 inches

Materials
Agape Love Minis and Nimbus Set

or

1 skein Jems Luxe Fibers Nimbus in Ruby Red MC
1 mini skein Jems Luxe Fibers Luxe Sock in each of these colors
Aphrodite CC1
Rubellite CC2
Agape CC3
Ruby Red CC4
Apple of Discord CC5

US Size N (9mm) hook

Tapestry needle

Gauge
3 sc = 1 inch
Gauge not critical

Begin Shawl
Holding MC and CC1 together, ch 270 loosely.

Row 1: Working in back loop of ch, sk first ch, sc3tog, sc across to last 3 chs, sc3tog. Turn.

Row 2: Ch 1, sc3tog, sc across to last 3 sts, sc3tog. Turn.

Rows 3 & 4: Rpt row 2.

*Break CC1. Pick up CC2 and hold it together with MC.
Rpt row 2 five times (or as many times as desired if you have extra yarn).

Rpt from * for each mini skein. Finish off both strands. Weave in ends. Block as desired.

Terms and Conditions